POSTS
Rails on Kubernetes - part 5: K8s Yaml Files
- 5 minutes read - 916 wordsRails on Kubernetes - part 5: K8s Yaml Files
This is one of a series of blog posts in which I’m walking through the process of deploying a rails application to a kubernetes cluster. Part one is here, and the previous article is here.
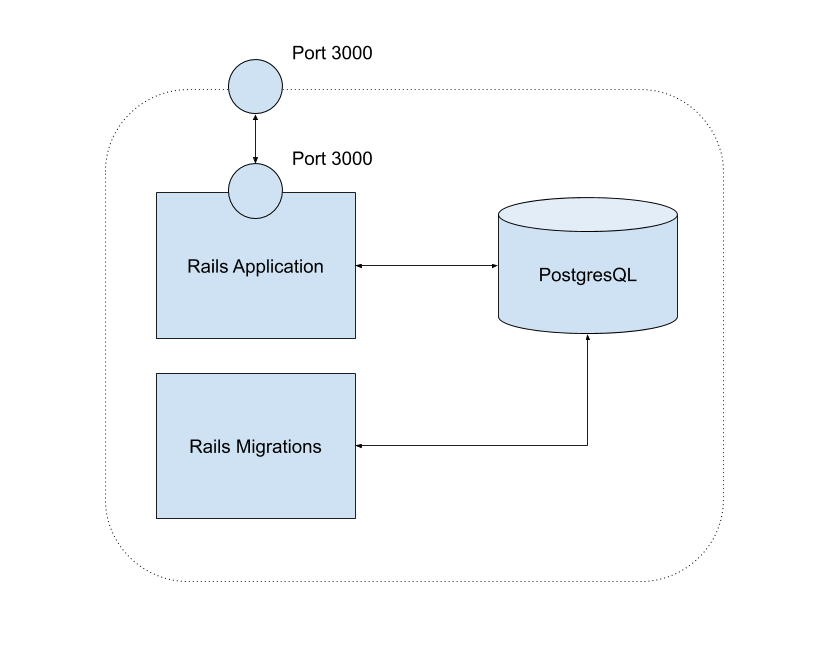
We’ve got our simple rails application running via docker-compose. Now we’re going to set up the configuration files we need to deploy it to our kubernetes cluster.
This is our docker-compose.yml file:
version: '2'
services:
  db:
    image: bitnami/postgresql:11.3.0
    environment:
      POSTGRESQL_USERNAME: my_user
      POSTGRESQL_PASSWORD: password123
      POSTGRESQL_DATABASE: counter_dev
  migrations:
    image: counter-app:1.0
    restart: on-failure
    command: ["bundle", "exec", "rails", "db:migrate"]
    depends_on:
      - db
    environment:
      DATABASE_URL: postgres://my_user:password123@db/counter_dev
  rails:
    image: counter-app:1.0
    ports:
      - "3000:3000"
    depends_on:
      - migrations
    restart: on-failure
    environment:
      DATABASE_URL: postgres://my_user:password123@db/counter_dev
We’re defining three ‘services’, each of which uses one docker image to carry out a task. Services refer to each other by name (e.g. the ‘rails’ service uses the hostname ‘db’ to talk to the db service), and we’re using environment variables for values that need to be shared between services (e.g. the database credentials).
Users can interact with our application because we’re mapping port 3000 on the host to port 3000 on the rails application container.
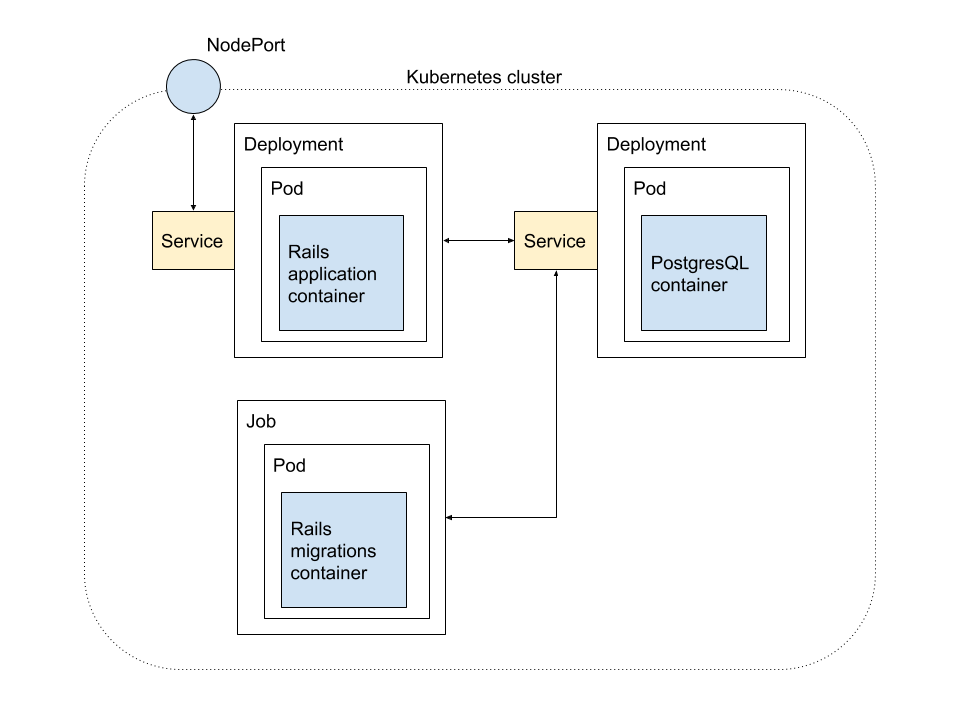
Kubernetes also uses yaml files for configuration, and you can see all of the concepts in our docker-compose.yml file in the corresponding kubernetes yaml files.
There’s a little more boilerplate, because kubernetes gives us a lot more flexibility than docker-compose in the way applications are structured.
You don’t deploy individual containers to kubernetes. Instead, kubernetes has the concept of a ‘pod’. You can put multiple docker containers into a single pod, but in general it’s better to have a single container per pod, in the same way that, in general, it’s considered better to have a single process running in each of your docker containers.
‘Deployments’ are collections of long-running pods. ‘Jobs’ are objects which run once and then exit, so we’ll use a job for our rails migrations.
‘Services’ allow kubernetes objects to communicate with each other.
In a real kubernetes deployment, we would normally use an ‘ingress’ to enable access to our application from outside the cluster. But, the mini-cluster we get from the docker desktop client doesn’t really support ingresses in the same way as a real cluster would. So instead, we’re going to use a special service called a ‘NodePort’ to expose our application so that we can interact with it.
So, what we’ll end up with is something like this:
Let’s create our kubernetes configuration files. First of all, create a ‘kubernetes’ directory in the ‘counter’ project to store all the files. We can create as many files as we want in this directory. Kubernetes will just concatenate them all together when we tell it to apply them, so it’s up to us how we want to break up our concepts into separate yaml files.
Let’s start with the database:
kubernetes/db.yaml
apiVersion: extensions/v1beta1
kind: Deployment
metadata:
  name: db
spec:
  replicas: 1
  template:
    metadata:
      labels:
        app: db-deployment
    spec:
      containers:
      - name: db
        image: bitnami/postgresql:11.3.0
        ports:
        - containerPort: 5432
        env:
        - name: POSTGRESQL_DATABASE
          value: counter_dev
        - name: POSTGRESQL_PASSWORD
          value: password123
        - name: POSTGRESQL_USERNAME
          value: my_user
---
apiVersion: v1
kind: Service
metadata:
  name: db
  labels:
    app: db
spec:
  ports:
  - port: 5432
    name: tcp
    targetPort: 5432
  selector:
    app: db-deployment
This defines the ‘deployment’, containing our single postgresql container, and a ‘service’ that lets other objects in the cluster communicate with the database. The ‘app’ label ‘db-deployment’ ties the service to the deployment, and the ‘name: db’ for the service enables other pods in the cluster to address the database using the hostname ‘db’.
Next, let’s define our migration job:
kubernetes/migrations.yaml
apiVersion: batch/v1
kind: Job
metadata:
  name: rails-migrations
spec:
  backoffLimit: 4
  template:
    spec:
      containers:
      - name: migrations
        image: counter-app:1.0
        command: [ "bundle", "exec", "rails", "db:migrate" ]
        env:
          - name: DATABASE_URL
            value: postgres://my_user:password123@db/counter_dev
      restartPolicy: OnFailure
We don’t need a service for this one, because nothing else will try to connect to it.
Notice the ‘restartPolicy: OnFailure’ and ‘backoffLimit: 4’. The migration job will probably fail, the first time it starts, because the database is unlikely to be ready at that instant. These settings will retry the job 4 times, before giving up completely.
The config for our main rails app. is very similar to the database configuration:
kubernetes/rails.yaml
apiVersion: extensions/v1beta1
kind: Deployment
metadata:
  name: rails-deployment
spec:
  replicas: 1
  template:
    metadata:
      labels:
        app: rails-deployment
    spec:
      containers:
      - name: rails
        image: counter-app:1.0
        ports:
        - containerPort: 3000
        env:
          - name: DATABASE_URL
            value: "postgres://my_user:password123@db/counter_dev"
---
apiVersion: v1
kind: Service
metadata:
  name: rails-service
spec:
  ports:
  - port: 3000
    targetPort: 3000
  selector:
    app: rails-deployment
Finally, we need our nodeport service to expose the application to web traffic.
We have to specify a ‘clusterIP’ for our NodePort service. To pick a suitable IP number, run this command:
kubectl get all
This should respond with something like this:
NAME                 TYPE        CLUSTER-IP   EXTERNAL-IP   PORT(S)   AGE
service/kubernetes   ClusterIP   10.96.0.1    <none>        443/TCP   38m
All we need for our NodePort is a valid cluster IP number which is not in use, so we can just add one to the clusterIP shown (which is the only one currently being used).
kubernetes/web-service.yaml
apiVersion: v1
kind: Service
metadata:
  name: web-service
spec:
  type: NodePort
  clusterIP: 10.96.0.2
  ports:
  - nodePort: 30001
    port: 3000
    protocol: TCP
  selector:
    app: rails-deployment
The ‘nodePort’ value must be greater than 30000. If you try to specify anything below that, you’ll get a helpful error message.
That’s it for our configs. In the next section, we’ll deploy the application to our kubernetes cluster.